Gannon Hall
Building an OpenAI-Powered Content Generation App with GPT-3 and Next.js
Starter apps are helpful in getting up and running quickly with new technologies. In this example app, we’ll use the power of generative AI to output original content. I wanted to provide two very different use cases — the first outputs product reviews in markdown format based on a given product name, and the second generates two-sentence horror stories based on your chosen theme. 😬 👻😳
Getting things set-up
You will need to have Node.js installed on your system to get started. You can download it from the official website here: https://nodejs.org/en/.
Next, clone this repository and navigate to the project directory:
git clone https://github.com/openai/openai-api-next-starter.git
cd openai-api-next-starter
To install the necessary dependencies, run the following command:
npm install

# or use yarn:

yarn
Now, make a copy of the example environment variables file:
cp .env.example .env Open the .env file and add your API key, which you can obtain from your OpenAI API dashboard (https://beta.openai.com/account/api-keys).
To run the app locally, use the following command:
npm run dev

# or with yarn...

yarn dev
Building the frontend
The frontend of the app is a React component called Review that allows users to input a product name and generate a product review in markdown format. The component makes a POST request to the backend API with the product name and receives a generated review as a response.
The Next/React component follows common patterns, starting with a few module imports for state management and code formatting (markdown in our case):
import Head from "next/head";
import React from "react";
import { useState, useRef, useEffect } from "react";
import hljs from "highlight.js";
The component has a state variable called productInput that stores the value of the product input field and a state variable called result that stores the generated review. Lastly, it has a state variable called isLoading that tracks whether the API request is currently being made.

 const [productInput, setProductInput] = useState("");
 const [result, setResult] = useState(() => "");
 const [isLoading, setIsLoading] = useState(false);
The component also has a reference to an element (textDiv)that will be used to display the generated review and an event listener (click)that copies the text textDiv to the clipboard when the copy icon is clicked.

 const textDivRef = useRef<HTMLDivElement>(null);
When the form is submitted, the onSubmit function is called. This function makes an API request with the product name and updates the result state variable with the generated review. It also clears the input field and sets the isLoading boolean to false.

  async function onSubmit(event) {
    event.preventDefault();
    setIsLoading(true);
    const response = await fetch("/api/review", {
      method: "POST",
      headers: {
        "Content-Type": "application/json",
      },
      body: JSON.stringify({ product: productInput }),
    });
    const data = await response.json();
    console.log("data", data);
    console.log("data.result", data.result);

    let rawResult = data.result;

    console.log("rawResult");

    const hljsResult = hljs.highlightAuto(rawResult).value;

    setResult(hljsResult);
    setProductInput("");
    setIsLoading(false);
  }
The component renders a form for users to input the product name, a button to submit the form, and a div element to display the generated review. If the isLoading state variable is true, the component displays a loading message. Otherwise, it displays the generated review in the div element, highlighted using highlight.js.
return (
    <div>
      <Head>
        <title>OpenAI API Starter - Review generator</title>
        <meta name="description" content="" />
        <link rel="icon" href="/favicon.ico" />
      </Head>

      <main
        className="flex flex-col
                    items-center justify-center m-20"
      >
        <h3 className="text-slate-900 text-xl mb-3">
          Product Review Generator
        </h3>
        <p className="text-slate-700 text-lg mb-3">
          Open AI starter app to generate product reviews
        </p>
        <form onSubmit={onSubmit}>
          <input
            className="text-sm text-gray-base w-full
                              mr-3 py-5 px-4 h-2 border
                              border-gray-200 rounded mb-2"
            type="text"
            name="product"
            placeholder="Enter a product name"
            value={productInput}
            onChange={(e) => setProductInput(e.target.value)}
          />

          <button
            className="text-sm w-full bg-fuchsia-600 h-7 text-white
                              rounded-2xl mb-10"
            type="submit"
          >
            Generate article
          </button>
        </form>
        {isLoading ? (
          <p>Loading... be patient.. may take 30s+</p>
        ) : result ? (
          <div className="relative w-2/4 ">
            <div
              ref={textDivRef}
              className="rounded-md border-spacing-2 border-slate-900 bg-slate-100 break-words max-w-500 overflow-x-auto  "
            >
              <pre className="">
                <code
                  className=""
                  dangerouslySetInnerHTML={{ __html: result }}
                />
              </pre>
            </div>
            <div className="absolute top-0 right-0 mt-2 mr-2 cursor-pointer copy-icon">
              <svg
                xmlns="http://www.w3.org/2000/svg"
                className="icon icon-tabler icon-tabler-copy"
                width="24"
                height="24"
                viewBox="0 0 24 24"
                strokeWidth="2"
                stroke="currentColor"
                fill="none"
                strokeLinecap="round"
                strokeLinejoin="round"
              >
                <path stroke="none" d="M0 0h24v24H0z" fill="none"></path>
                <rect x="8" y="8" width="12" height="12" rx="2"></rect>
                <path d="M16 8v-2a2 2 0 0 0 -2 -2h-8a2 2 0 0 0 -2 2v8a2 2 0 0 0 2 2h2"></path>
              </svg>
            </div>
          </div>
        ) : null}
      </main>
    </div>
  );
}
Building the backend
The backend of the app is a serverless function that handles the API request and generates a product review using the OpenAI API. (To clarify, there are two APIs I refer to in this post: 1) the OpenAI API we call from our 2), serverless function API in the /apiroute of our app.
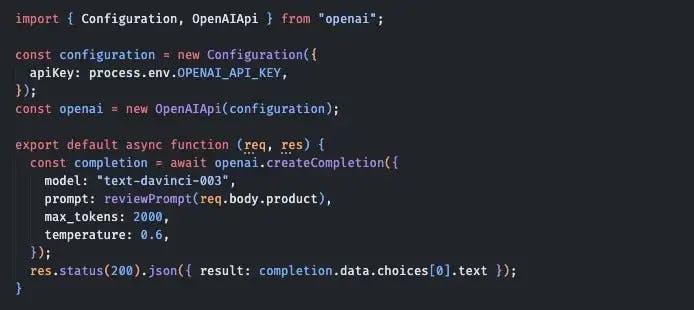
The function (/api/review.ts) starts by importing the Configuration and OpenAIApi classes from the openai module. It then creates a configuration object with the API key, which is stored in an environment variable. It also creates an openai object using the configuration object.
import { Configuration, OpenAIApi } from "openai";

const configuration = new Configuration({
  apiKey: process.env.OPENAI_API_KEY,
});
const openai = new OpenAIApi(configuration);
The function then exports an async function that takes in a request and response object as parameters. This function uses the createCompletion method of the openai object to generate a product review based on a given prompt. The function then sets the response status to 200 and returns the generated review as a JSON object in the response body.

export default async function (req, res) {
  const completion = await openai.createCompletion({
    model: "text-davinci-003",
    prompt: reviewPrompt(req.body.product),
    max_tokens: 2000,
    temperature: 0.6,
  });
  res.status(200).json({ result: completion.data.choices[0].text });
}
It is in this function where the magic happens. In this example, we are setting a few parameters to instruct GPT-3. For instance, we are using the text-davinci-03 model for this example. I highly recommend reading the API reference docs to learn how to use and fine-tune the various models. You’ll see that for the “Short Story” API function, we have different settings for the same model:
export default async function (req, res) {
  const completion = await openai.createCompletion({
    model: "text-davinci-003",
    prompt: reviewPrompt(req.body.product),
    max_tokens: 150,
    temperature: 0.8,
    top_p: 1.0,
    frequency_penalty: 0.5,
    presence_penalty: 0.0
  });
  res.status(200).json({ result: completion.data.choices[0].text });
Again, read the docs to learn what they do!
Finally, the function has a helper function called reviewPrompt that takes in a product name and returns the complete prompt string with the product name included and corrected (i.e., “iphon 14 max kro” ➡️ “iPhone 14 Max Pro”). The product review string is what tells GPT-3 exactly what we want it to generate for us.
function reviewPrompt(productName) {
  return `Product name: KRK ROKIT 5 G4 5 inch Powered Studio Monitors
  Review:
  ## KRK ROKIT 5 G4 5 inch Powered Studio Monitors

  <ProductImage imageName="krk-rokit-5-g4.jpg" imageAlt="KRK GoAux 4" />

  | Attribute | Score |
  | --------- | ------ |
  | Build quality | 8.0 |
  | Sound quality | 8.5 |
  | Playability / Ease-of-use | 8.5 |
  | Compatibility | 8.0 |
  | Value | 8.5 |

  The KRK ROKIT 5 G4 5 inch Powered Studio Monitors are a reliable choice for recording and mixing in a home studio or professional setting. With their bi-amped design and Kevlar drivers, these monitors deliver accurate sound with a wide frequency response.

  The ROKIT 5 G4 monitors feature a built-in DSP-driven EQ that allows for precise tailoring of the monitors' response to the room. The included Auto Room Correction feature uses a measurement microphone to optimize the monitors' response to the acoustic environment.

  <ProductLinks gcUrl="" amzUrl="" />

  ### Pros
  - Accurate sound with wide frequency response
  - Built-in DSP-driven EQ and Auto Room Correction feature
  - Variety of connectivity options

  ### Cons
  - Some users may find the bass response to be lacking

  ## Best For
  The KRK ROKIT 5 G4 5 inch Powered Studio Monitors are suitable for recording and mixing in a home or professional studio. They are particularly useful for those who need precise control over the monitors' response to the room.

  ## Key Specifications
  - Frequency response: 43Hz-40kHz
  - Power: 50 W RMS / 100 W peak
  - Inputs: XLR, TRS, RCA
  - Outputs: 1/8" stereo headphone output

  <ProductLinks gcUrl="" amzUrl="" />

  Product name: ${productName}
  Review:`
}
Deployment
If you want to deploy the app, I recommend using Vercel (https://vercel.com/). Vercel is the company behind Next.js and offers seamless deployment for Next.js apps. Included in this repository is a vercel.json file, which you will need to set a higher serverless function timeout since the OpenAI API can take 20-30 seconds to compute. Please note that Hobby accounts on Vercel always time out at 10 seconds, so you need to upgrade to a Pro account for this to work.
If you found this post useful, feel free to follow me on Twitter (I’ll definitely follow you back 😀) https://twitter.com/gannonh