Gannon Hall
Building a Discord Chatbot with GPT-3 and Node.js
In this post, we’re going to build a Discord chatbot using Node.js and OpenAI’s GPT-3 language model. Afterward, you should have a solid starter app to build exciting and useful Discord bots.
With OpenAI’s GPT-3 API, you can — with just a few lines of code — create a bot that can produce code, tell jokes and stories, develop recipes, and whatever else you can think of. The text generated by GPT-3 is almost indistinguishable from content written by an actual human, making it an ideal tool for chatbots. By combining GPT-3 with Discord, a popular messaging platform for communities, you can build a robust and intelligent chatbot that can automate tasks and interact with users.
Things you’ll need
- A code editor like Visual Studio Code or WebStorm
- An OpenAI API key
- Node.js v16 or newer
- A Discord account
Getting set-up
Initialize your app
In this step, you’ll set up your Node.js application for your chatbot.
Create a new folder called “discord-bot” — this will be your project’s root. From the project root, initialize Node to generate a package.json file to house dependencies and other metadata.
mkdir discord-bot
cd discord-bot
npm init -y
Install dependencies
You need to install three Node packages for your project:
- Discord.JS — Discord’s official package for interacting with their API.
- OpenAI Node.js Library — The official API library for OpenAI.
- Dotenv — To store and access environment variables.
npm install openai discord.js dotenv
Define your environment variables
To keep your API keys secure, you’ll use the dotenv package to store them as environment variables. This way, they won’t be exposed in your code.
First, create a file called .env in your project’s root directory by running the command: touch .env
Then, open the .env file with your code editor and add the following lines:
OPENAI_API_KEY=XXXXXXXX
BOT_TOKEN=XXXXXXXX
# Be sure to add the .env file to your .gitignore file,
# especially if you plan to publish your repo publicly.
Set-up Discord
Server
The first step is setting up a Discord server for testing your bots. Even if you already have a server set up, I suggest setting up a server explicitly to test your bots.
- Download and open the Discord client or go to the web client. Click on the green + icon on the left tab to create a new server.
- A menu will pop up asking you to choose a template. Choose “Create My Own” and fill in the details for your new server.
Discord bot
Once your server is created, go to the Discord Developer Portal.
- To create a new application, click on the “New Application” button in the top right corner. A dialog box will appear for you to enter a name for your application, input “discord-bot” or whatever you want, and click “Create.” You will then be directed to the portal for your newly created application.
- Click on the “Bot” tab in the application portal.
- Click “Add Bot” and “Yes, do it!” to turn your application into a bot.
- Click the “Reveal” button to reveal your bot’s token and copy it.
- Open your .env file and paste your token.
- Back on the portal, scroll down and enable the “Message Content Intent” in the privileged intents section.
- Next, go to the OAuth2 tab and copy your “Client ID.”
- Use this link to authorize your bot to your server https://discord.com/oauth2/authorize?scope=bot&permissions=8&client_id=YOUR_CLIENT_ID; replace YOUR_CLIENT_ID with the client ID you just copied.
- Click “Authorize” after choosing the newly created server you want the bot to join.
That’s it! Once the bot joins the server, you can now start coding!
Building the GPT-3 Chatbot
Ok, now the fun begins!
First, create a index.js file by running the following command:
touch index.js
Then, add the following code to the index.js file:
import dotenv from "dotenv"
import { Client, GatewayIntentBits } from "discord.js"
import { Configuration, OpenAIApi } from "openai"

dotenv.config()

const client = new Client({
  intents: [
    GatewayIntentBits.Guilds,
    GatewayIntentBits.GuildMessages,
    GatewayIntentBits.MessageContent,
  ],
})
const configuration = new Configuration({
  apiKey: process.env.OPENAI_API_KEY,
})
const openai = new OpenAIApi(configuration)

client.login(process.env.BOT_TOKEN)
This code uses the dotenv package to import the environment variables you set up in the .env file. It also imports the necessary packages from discord.js and openai to interact with the Discord and OpenAI APIs. The client variable represents your Discord bot and can notify you of any events in the server, such as new messages.
To test your bot, run the command: node index in the terminal. This will log in your bot to the Discord server. Type in a message on your Discord server, and you should see your chatbot reply back. If you interact with it, you’ll see that this newly birthed bot is pretty dumb. Let’s fix that with GPT-3!
Messaging the bot
Before we wire up the bot to GPT-3, let’s set things up so it can receive and respond to our messages. Update the index.js file with the following code:
import dotenv from "dotenv"
import { Client, GatewayIntentBits } from "discord.js"
import { Configuration, OpenAIApi } from "openai"

dotenv.config()

const client = new Client({
  intents: [
    GatewayIntentBits.Guilds,
    GatewayIntentBits.GuildMessages,
    GatewayIntentBits.MessageContent,
  ],
})
const { Configuration, OpenAIApi } = require("openai")
const configuration = new Configuration({
  apiKey: process.env.OPENAI_API_KEY,
})
const openai = new OpenAIApi(configuration)

client.on("messageCreate", function (message) {
  if (message.author.bot) return
  return message.reply(`${message.content}`)
})
client.login(process.env.BOT_TOKEN)
The code above uses the on method of the Discord client to send notifications of events on the server; in our case, the event is "messageCreate." This function will run every time the bot sees a message on the server. The if statement on line 11 checks to see if the author of a message is a bot and if it is, it stops the function. This is to ensure that the bot doesn't respond to itself.
Line 12 is added for testing purposes to see if the chatbot can read and respond to messages. Save the file and run the bot again using the following command in the terminal:
node index
Type in a message in your Discord server, and you should see your chatbot reply back with the same message. Press CTRL+C in your terminal to stop the running index.js file. Now that your bot can read and respond to messages, it’s time to integrate it with GPT-3.
Integrating GPT-3
Before we start integrating GPT-3, it’s important to understand how it works under the hood. The backbone of the OpenAI API is the completions endpoint. This is where you provide a prompt, and the model generates a text completion based on the context or pattern of the prompt.
For example, if you give the prompt “ask not what your country can do for you,” the API will return the completion “ask what you can do for your country.” The concept of prompts is very important to understanding how to work with GPT-3
Here is a simple example of a product name generator.
Prompt
Product description: A home milkshake maker
Seed words: fast, healthy, compact.
Product names: HomeShaker, Fit Shaker, QuickShake, Shake Maker
Product description: A pair of shoes that can fit any foot size.
Seed words: adaptable, fit, omni-fit.
Sample response
Product names: AdaptFit, OmniSecure, Fit-All, AdaptShoes.
As you can see, the prompt provided “trains” GTP-3 to generate exactly what we want by establishing a pattern of examples. Essentially you are playing a game of “finish my thought” with GPT-3. This is a simple example, but what can be accomplished with more sophisticated prompts is amazing. This process of designing prompts is aptly named prompt engineering. A quick google search will show that it‘s become a bit of a cottage industry. And for a good reason — it's an extremely powerful but easy-to-grasp way of generating high-quality, purpose-built content. Want to write a technical blog post in the style and language of Shakespeare… easy!
To better grasp how the completions endpoint works, spend time with OpenAI’s Playground and check out the examples. OpenAI has done a great job on its DX (developer experience). The playground allows you to save your work, so this is a great place to engineer your prompts. My approach is to start with one of their examples (I hate a cold start!) and build it out from there.
Adding our prompt
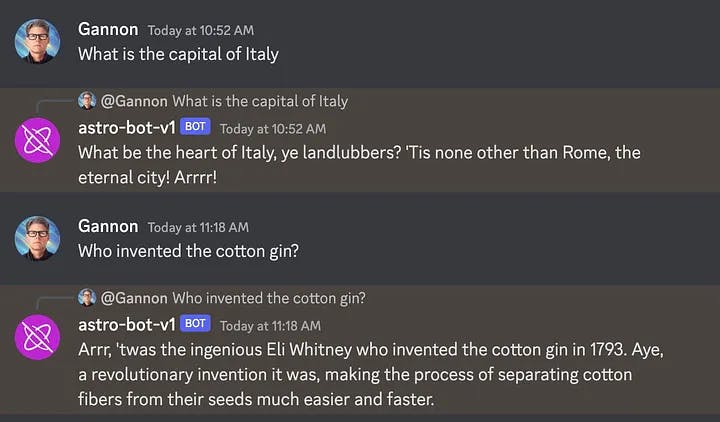
I thought it would be fun to create an answer bot that speaks like a pirate. pirate! Arrr! 🏴☠️🤣
Let’s add our prompt to our app. Insert this code right after the early return:
// ...
client.on("messageCreate", async function (message) {
  if (message.author.bot) return;
  let prompt = `Jack is an 18th century pirate captain from the Caribbean who answers questions\n\
Question: How many pounds are in a kilogram?\n\
Jack: Arrrr, aye, a kilogram be equal to 2.205 pounds, me hearties!\n\
Question: What is the circumference of the earth?\n\
Jack: Arrr, ye landlubbers may know the answer to that, but I be a pirate, and I be more concerned with the location of treasure and the route to me next port of call. Ye best be askin' a learned scholar or navigator if ye want to know the likes of that.\n\
Question: When did humans first land on the moon?\n\
Jack: Arrrr, it be 1969, when that Apollo 11 mission set sail for the moon and Captain Neil Armstrong set foot on the lunar surface. Aye, a historic moment for all of mankind it was.\n\
Question: What is the capital of Italy?\n\
Jack: What be the heart of Italy, ye landlubbers? 'Tis none other than Rome, the eternal city! Arrrr!\n\
Question: ${message.content}\n\
Jack:`;
// ...
Now replace the existing return message.reply(`${message.content}`); with the following:
// ...
client.on("messageCreate", async function (message) {
  if (message.author.bot) return

  const userQuery = prompt
  console.log("prompt: ", userQuery)
  try {
    const response = await openai.createCompletion({
      prompt: userQuery,
      model: "text-davinci-003",
      max_tokens: 2500,
      temperature: 0.3,
      top_p: 0.3,
      presence_penalty: 0,
      frequency_penalty: 0.5,
    })
    const generatedText = response.data.choices[0].text
    return message.reply(generatedText)
  } catch (err) {
    console.error(err)
    return message.reply(
      "Sorry, something went wrong. I am unable to process your query."
    )
  }
})
// ...
This is the most important part of the app, so let’s walk through the code step by step:
-
We use the messageCreate event to listen to every message sent on the server. Everything is happening within this event, hence… client.on
-
We check if the message was sent by a bot. If it’s a bot, we do an early return and nothing more. Assuming the message is not from a bot…
if (message.author.bot) return
-
We define a useQuery constant and pass it the prompt string defined above
-
We call the API using createCompletion passing the prompt, the model, the number of tokens, the temperature, the top_p, the presence penalty, and the frequency penalty. You can read about what all of these do in the OpenAI API docs.
-
We then get the text from the generated response and reply to the message with the generated text.
Testing out the GPT-3 Discord
Fire up the bot:
node index
Head to your Discord client and have a chat:
Next Steps As you can see, we were able to create a purpose-built bot with just a few lines of code. The possibilities are endless. If you plan to build out your own bots, the best place to start is the OpenAI, Playground and Examples.
Full source on Github.